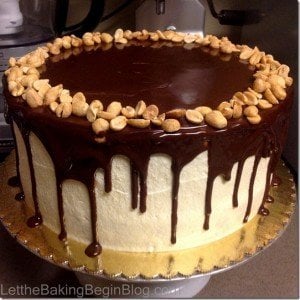
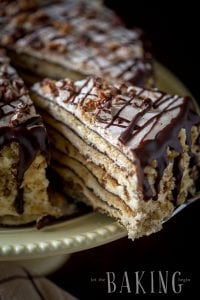
Kiev Cake – Киевский Торт
Kiev Cake – Soft Sponge layers sandwiched with Peanut Meringue & Sweetened Condensed Milk Buttercream.

Finally, I am able to update the picture for this wonderful cake. So far this cake is the most popular post on my Instagram account and for a reason. There’s just something very nostalgic about its flavor, at least for those that have left post-USSR countries.
What’s the Original Kiev Cake?
The original cake consisted of 2 meringue-based cake layers (meringue+flour + finely chopped cashews) and layered with the Russian Buttercream (condensed milk + butter). Nevertheless, this is a delicious alternative and if you bought “Kiev Cake” at a Russian store, this is what it would look at taste like.
The only Kiev Cakes that have the original flavor described above, would be sold in a signature round carton box, with chestnut tree leaves on it, made by Roshen bakery in Ukraine

How’s this cake different from Original Kiev Cake?
The biggest difference is the fact that this cake uses sponge cake in place of the Dacquoise layers (meringue + nuts). BUT! This IS the version people will think about when you mention “Kiev Cake”.
So, with this let me introduce you to the cake that was most frequently ordered, back when I made cakes to order. I even had a customer freeze it so she can take it on a plane when she visited her sister across the US.
Here are some other CAKE recipes:
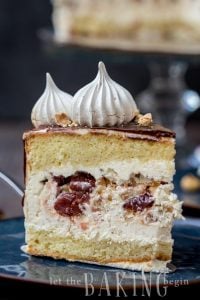
- Russian Royal Cake – Chocolate cake with walnuts, poppy seeds, and cherries.
- Peaches & Cream Cake – Sponge cake with peaches and sweet cream.
- Marbled Cheesecake with Caramel – The best cheesecake recipe.
Kiev Cake – Киевский Торт
Kiev Cake - Soft Sponge layers sandwiched with Peanut Meringue & Condensed Milk Buttercream.
Ingredients
Hazelnut Meringue
- 4 egg whites room temperature
- 2/3 cups sugar
- 1/8 tsp cream of tartar / 1 tsp lemon juice
- 1 tiny pinch of salt
- 1 cup peanuts lightly salted and roasted
Vanilla Simple Syrup
- 1/2 cup sugar
- 3/4 cup water
- 2 tablespoons vanilla extract
Yellow Sponge Cake - 10 inch round
- 6 large eggs
- 1.5 cups all-purpose flour
- 1.5 cups granulated sugar
- 5 tablespoons butter, unsalted, melted
- 3 tablespoons water
- 2 tsp baking powder
Chocolate Ganache
- 75 grams dark chocolate good quality chips or chopped chocolate
- 100 grams heavy cream, at least 30% fat
- 3 tablespoons glucose or corn syrup optional - for extra shine
Frosting
- 16 oz butter, unsalted room temperature
- 1 3/4 cans sweetened condensed milk room temperature
- 8 ounces cool whip optional
Also
- 1/2 cup roasted peanuts for decorating
Instructions
How to make the Peanut Meringue
-
Turn the oven to 220°F. Line a jelly roll pan with parchment paper. Set aside.
-
In a bowl of an electric mixer, fitted with a whisk attachment whip 4 egg whites, a pinch of salt and ⅛ tsp cream of tartar for 2 minutes on high speed. With the mixer still running, add sugar 1 tablespoon at a time. Continue whipping for another 9 minutes, until stiff peaks and white and glossy appearance.
-
With a tablespoon, spoon the meringue onto the prepared baking sheet, into little mounts. Place them 1-2 inches apart. Sprinkle each meringue mount with peanuts.
-
Bake in the preheated oven for 3 hours, or until a meringue taken out of the oven, allowed to cool to room temperature and cracked in half, is dry in the middle. Allow to cool on a cooling rack.
Simple Syrup
-
Bring 3/4 cup water and 1/2 cup sugar to boil. Stir, allowing the sugar to dissolve. Let cool to room temperature. Add 2 tbsp vanilla extract and stir again.
Cake
-
Preheat your oven to 350°F. Line two 10 inch round with aluminum foil or parchment paper. Spray with nonstick spray. Place wet cake strips around the pan (if available), to keep the cake from forming a dome when baked. Set aside.
-
In a separate bowl, sift together 1½ cups flour and 2 tsp baking powder, set aside. Melt 5 tbsp butter, add 3 tbsp hot water and whisk together, set aside.
-
In a bowl of an electric mixer, fitted with a whisk attachment whisk the 6 eggs on high speed, until lightly foamy. With the mixer still running add 1½ cups sugar, 1 tablespoon at a time and continue whipping for about 10 minutes. The mixture will be pale yellow and foamy.
-
Add the flour mixture into the egg mixture in 3 additions, carefully folding each flour addition before adding the next.
-
Add the butter and water mixture into the egg mixture and fold it carefully until completely incorporated.
-
Pour the batter into the prepared pans, distributing the batter evenly. If you have only 1 pan, make only 1/2 the batter at a time.
-
Bake in preheated oven for 20+ minutes, until a toothpick inserted in the middle comes out clean. Do not open the oven before 15 minutes.
-
Let sit in the pans for 5 minutes. Invert onto a cooling rack. Remove the foil and allow to cool completely.
Chocolate Ganache
-
Bring 100 grams cream and 3 tbsp glucose/corn syrup to simmer, pour over 75 grams chopped chocolate/chocolate chips. Allow sitting for 2-3 minutes. Stir until the mixture is smooth and glossy.
Frosting
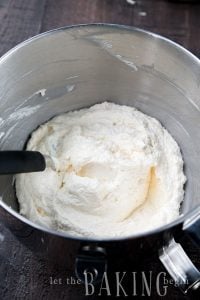
-
In a mixer fitted with a whisk attachment, whip 16 oz butter until white and fluffy on high speed, about 3 minutes. Scrape the bottom of the bowl, 2-3 times throughout the whipping process.
-
With the mixer still running, pour 1¾ cans condensed milk down the sides of the bowl, when most of the condensed milk is whipped into the butter, stop the mixer.
-
Add 8 ounces cool whip, and gently fold it into the rest of the frosting. Use right away.
Assembly
-
Place a dab of frosting onto a platter. Place your 1 cake layer, bottom side up on top and press to adhere. Place 4, 3inch wide strips under the edges of the cake, completely covering the edges serving platter (this will make for easy cleanup later on).
-
With a pastry brush, brush on half of the simple syrup.
-
Place a couple of tablespoons of frosting and spread it out onto the cake layer.
-
Take 1 meringue, holding it by the 'bottom', dip the top into the frosting and adhere the meringue to the spread out frosting on the cake, bottom side down. Repeat with the rest of the meringue mounds, covering the cake layer with meringues. Place a couple more tablespoons of frosting on top of meringues and spread it out. (Optional - reserve 5-6 meringue mounts for decorations)
-
Place the other cake layer, bottom side up, on top and press to adhere.
-
With a pasty brush, soak the cake with the rest of the simple syrup. Cover the whole cake in the leftover frosting. Place in the fridge for about 15-20 minutes.
-
Take it out of the fridge, pour the ganache in the middle of the cake and while rotating the cake on the cake turnable, with the help of your spatula, allow the ganache to drip over the sides of the cake.
-
Sprinkle some peanuts around the edge of the top of the cake, or place the reserved meringue in the middle first, then drizzle with chocolate ganache & sprinkle with peanuts.
-
Remove the strips from under the cake and refrigerate overnight.
-
Serve at room temperature with coffee or tea.

Thank you for following me on Instagram, Facebook & Pinterest!
Hashtag your photos #LetTheBakingBeginBlog so I can see your creations and for a chance to be featured!
Wonder how I made the chocolate drizzle on my cake?
Use the technique from the video, skipping the first “piping” of the streaks.
Bon Appetite!
Marina | Let the Baking Begin


I made this cake for my husband’s birthday – he had childhood memories of Kiev cake and was hoping I could make the dream come true :). The cake was a HUGE hit with the whole family! I decided not to make the chocolate ganache, but the rest was done according to the recipe. I definitely agree with you – tart cherries give the cake a great twist. Your Yellow Sponge cake is the best sponge cake I ever made (and I bake quite a lot). It will definitely be my go-to sponge recipe going forward!
One question. Is there a way to make the Yellow Sponge cake to have lemony flavor (for another cake)? I can add lemon zest, but not sure that adding lemon juice wouldn’t ruin the recipe. Any advice?
Marina
I love hearing stories like yours. Thank you for sharing your feedback, Marina!
As to your question – it’s hard to achieve true lemony flavor without the addition of additives like a lemon emulsion and such. Acid from the lemon juice just bakes off and the zest only gives a very faint residual smell, but no flavor.
Hello,
I want to make this cake in a 7 inch. Can you please help with how to make the meringue in 7 inch pans? How many egg whites and how long to bake 2 pans? Please and thank you!
Hi would this be ok to make with hazelnuts instead of peanuts?
Any nuts are ok for this cake.
Any nuts would be ok for this cake, as long as you like them.
Used the ganache on Kievskiy cake. Always comes out smooth and delish.
Correction: there is nothing Russian about this cake. Kyiv has always been capital of Ukraine, and this cake was created by Roshen, the confections factory formerly owned by now President of Ukraine, Poroshenko. And peanuts? Never! It is made with hazelnuts. In a pinch, almonds. Never would a Ukrainian make this complex torte with peanuts.
Hi Baba Raisa,
If you read the second paragraph of my post, it might’ve saved you some time 😉
Btw, I am Ukrainian. I make this complex torte with peanuts. Hope it’s ok with you 😛
I was wondering if this cake will have tutorials with pics of how u make it soon?
Believe it or not, it is! I am planning to post it about next week. So check back soon on the front page.
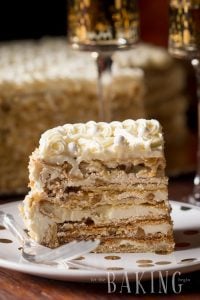
Hi, this cake looks awesome but I do have a comment about it, to make a true Kiev cake the crispy meringue is supposed to go in between the layers of the cake.
The part I struggle with the most with this cake is getting a good crispy meringue that doesn’t stick to the paper…tips on doing that successfully would be much appreciated.
Hi Anita,
this cake is actually exactly that – two layers of cake with meringue in between it.
To get the meringue not to stick to paper, just make sure not to use wax paper, but to use good quality parchment paper.
If you like the Kiev cake, check this chocolate version of the same thing it has step by step instructions and pictures of the cake on the inside, I think you will like it. Chocolate Kiev Cake.
When I looked at the picture of the cake, I think I realized why you said you did. You probably think that there’s only meringue on top of this cake. In reality, there IS a meringue layer in between sponge layers in the middle and the top has just a couple meringue pieces as decoration, but they’re not the main meringue layer.
Hi Marina,
I made the frosting and it didn’t turn out. Just wouldn’t emulsify like it was supposed to. It was cool in the kitchen. Maybe the butter was too cold? Would that make a difference? I used it anyways and I love how the salty peanuts tone down the sweetness of the cake. Also to make a 13×9 inch do I just double the recipe? Also does your meringue stay crispy for a few days?
Marina, I really mean when I say I have never eaten this good cake
from a recipe written on the internet, less from a book. I really appreciate honest people as you.
In Stockholm this kind of cake is never to be found, maybe on a really expensive restaurant.
I actually made this cake the first time for my mother´s 59 years birthday, actually should have been the 60 (my mistake)
But it was a huge success anyway.
I wish you success with what you want to acchieve in life.
Thank you.
Oh my goodness Eva, that is so wonderful to hear! I’m glad you enjoyed this cake and wanted to thank you for taking the time to come back and comment! Kiev cake is a cake that originated in the capitol of Ukraine and is very popular where I come from, this chocolate version was just a spontaneous twist on an already awesome classic!
Thank you and hope you enjoy this holiday season!
Marina
Hi Marina,
Thank you for the wonderful post! I’m making the Kiev and the Napoleon cake for my Russian mom as a surprise. I think she will be very happy. While making the Napoleon yesterday i tested a little bit and it was (like we say here in Holland) like an angel pissed on your tong. It was the best thing ever!!! Thank you so much.
As I was preparing this recipe I googled coolewhip, as how we do not have that in Holland…. and I was really shocked. I so a blog post named horryfing 12-day experience by jonathanfields in wich the coolewhip does not change for 12 days! Maybe this terrific Kiev cake can do without?
Love to here your thoughts.
Have a lovely christmas and greetings all the way from the Netherlands!
Anna
Hi Anna,
I think your mom will be pretty impressed. Those cakes are not the easiest so good for your for not being to scared to try new things 🙂 and what an expression lol, haven’t heard anything like that before))
While you can totally omit the addition of Cool Whip, that experiment might be a bit fake 🙂 I’ve left cool whip on the table for a day and it starts to weep couple hours in. And I’ve had cool whip go moldy on me one time while being in the fridge because I didn’t throw it away in time 🙂 So while I try to stay away from Cool Whip (because it is pretty fake and does not consist of real food), I know people that do use and like it. But feel free to just not use it 🙂
Merry Christmas to your family!
Marina
I made this cake according to directions. Very good flavor. My mirangue turned out sticky on the outside. And noticeably chewy once assembled in cake layers. Any tips or ideas what caused the sticky chewy texture?
Thanks!
I can’t wait to make this cake again.
Hi Jessica,
I am not sure to be honest what is causing the meringue to be sticky and chewy, but I think it might be because you overwhipped or underwhipped the meringue. I will try to post a step by step tutorial for this cake one day, to show just exactly what the meringue should look like when it’s properly whipped.
so you dont bake the meringue all together? you bake them in circles?
You can bake it on one big round circle, or you can make them smaller like I have the instructions to do. If you bake it in one big circle it takes longer to bake through and then the meringue will be harder inside the cake. I like that with smaller ones it’s faster to bake and it’s it tastes better as the meringues become softer and easier to cut through.
Do we use all purpose or cake flour? Thanks!
Awesome cake! Love it, please help me with the glaze, is it enough glaze for 10 in cake? Looks like not too much chocolate. And does it set ok.? If it drip down the sides of cake I frosted w frosting will it melt? I’ve had too much trouble in past just really want to avoid this time, thanks soooo much!
Hi Julie!
Thank you! Yes it is enough if you just cover the top like on the picture. I use this recipe as my go to recipe for glazing all of my cakes.
Let me tell you some ground rules when it comes to ganache.
1. it has to cool down to room temperature before you pour it over the cake, or it will melt the frosting and make a mess.
2. the cream that you pour over chocolate should not be boiled, just very hot, otherwise it will curdle the chocolate. So as soon as you see steam coming from the cream, turn it off, don’t boil it.
3. if you have mixed chocolate and cream together, cooled it down and it’s too thick to pour, you can either add a little bit of cold whipping cream (1-2 tbsp at a time) or warm it up, slightly (do not make it warm). Different brands of chocolate contain different amounts of cocoa solids, the more cocoa solids they have the thicker the ganache will be. So adjust it accordingly.
4. To check if ganache is thick enough to pour over cake, take a teaspoon and drip some chocolate ganache on the inside of the cup, creating a streak, if it pours down in a nice drizzle, without running off leaving see through ‘drizzle’ it’s ready to be poured.
Let me know if you have any more questions or if you need clarification on anything else.
Thanks!
Thank you so much dear for such awesome details! It did work! I really appreciate your time! May God bless you and I feel blessed getting all the details from your site, there are people who won’t share any recipes and you do it so nicely and openly!! Goes bless you! I love all your posts and really enjoy them!
Hi Julie,
Thanks so much for your wonderful and kind words! it really feels good knowing that what I do is appreciated by others like you! God bless you!
Can I make the glaze without the corn syrup? Use something else or just not use it at all or it will not look so shinny and smooth?
Yes, you can totally omit the corn syrup. It adds more gloss to the glaze, but it definitely is not going to look bad without it.
Am i reading this wrong? You said to use 2 – 10″ pan and then cut in half right? But when you assemble you only mention 2 layers instead of 4? Should it be only one 10″ pan then?
Hi Olga,
I don’t think it tells you anywhere in the recipe to split the cake layers. You bake them separately, which makes 2 cake layers. You use one for the top and one for the bottom.
Don’t be tempted to just bake the batter in 1 pan and split it in half. If you do so, your cake will not rise as much as it is supposed to.
Happy baking 🙂
What a beautiful cake, the chocolate glaze on it looks perfect. You are one talented baker :).
I think pouring the glaze over and spreading it to drizzle is my most favorite part of the whole process))
Ooh Marina, what you describe sounds like a dacquoise which I love! I hope you find the recipe soon. 🙂
Yes, it is daquoise, I wasn’t sure if you would know what I was talking about if I called it that ))
Beauty! Do you have the recipe posted of the “original” Kiev Cake because it sounds amazing! I can never have too much meringue. 🙂
Thank you! The original recipe actually is not even a meringue. It’s a meringue & nut based cake. Basically, the meringue is mixed with the nuts and then baked, when this is done the cake does not look or feel like a regular meringue, but rather a mix of the two. I do not have the recipe, but I will find a good one, and when I am satisfied with the results, post it 🙂
I think your site would be more popular and much better if you include step-by-step pictures of the process 🙂 some people are visual learners 🙂
Oh Anna, at this point it’s either this or nothing. As you know, I am in school full time and have other commitments that give me only so much time for the upkeep of my hobby))But one day, may be I will start doing the step by step pictures. Thank you for suggestion!
Thank you SO much for sharing ths recpie! It’s just what I was looking for—-i googled royal icing with dry egg whites and your recpie popped up. So glad it did!! It was my first time decorating cookies and was a huge success! I feared the icing ruining my cookies as I’ve had yoall icing in the past that I didn’t like at all. Ths recpie was just the opposite. It was so yummy and really enhanced my cookie favors. It was crunchy and hard like you want it while still being creamy with some give—lovely! I followed directions just as you had shared for the smaller batch using fresh lemon juice in the amount indicated and then I added 1 T pure vanilla. I decided to have off-white frosting in exchange for a tastier frosting. I was surprised by how white the frosting still was and didn’t seem to affect my colors. Plus, I did get bright white coloring if needed. I just love pure vanilla. And the consistency was perfect! I love how you start with a stiff batch and then can spray water on the various colors to get the consistency needed for each color. Worked great! Piped beautifully with my bottles with tips. Thanks so much!!!!
Hi Marina,
I plan on using your recipe next time I make this cake. Every time I try to make the meringue for the cake I mess it up somehow. It either crumbles or doesn’t dry fully in the middle.
Crumbling issue might be because you over whip it, just don’t go past their ‘stiff peak’ stage. Over whipped meringue looks chunky instead of smooth.
To get them to dry in the middle, just leave it in the oven longer until it IS dry in the middle. TO check, take one meringue out, let it cool and then see if it’s hard in the middle (when you break it), if it is, take it out, if not, leave it until it is dry 🙂
Oh and DO read the instructions. I have people tell me sometimes that the recipe doesn’t work, or that their meringue is not the way it’s supposed to be, just to find out that they did not bake it at specified temperature, or didn’t add enough sugar, or took it out a couple hours too early)))
Let me know once you make it 🙂
Beautiful as always Marina! the brand is Roshen from Ukraine 🙂
Thanks Tanya! You are right, that’s the one!
You don’t need to update the picture – it looks fine as it is! One of my most favorite cakes from childhood! I hope I will have time to make this cake soon.
Thanks so much Julia!