Super Soft Doughnuts with Sugar Glaze
Super Soft Doughnuts with Powdered Sugar Glaze is a doughnut recipe that you’ll love! These homemade doughnuts are soft, yet crispy making the perfect glazed donut.

*PIN this recipe to your Dessert board *
Super soft, adorned with crispy sugar glaze these doughnuts were a huge hit in our family! This recipe makes the perfect glazed donut!
Simple, Soft Doughnut recipe!
Ever since I got my bread maker down from a shelf in the pantry, it’s been too convenient not to use it. You know, with it just sitting on the counter doing nothing. I have been making doughnuts, dinner rolls, sugar crescents, all kinds of different recipes!
Using the breadmaker where you just toss everything in and let it do the work for you, makes this doughnut recipe very easy (and tempting to want to make them every day haha!).

The perfect Glazed Donut…
One day with my bread maker already out, I decided to make homemade doughnuts. I have made doughnuts before but these glazed donuts were the best I have ever made. A deliciously soft, yet crispy doughnut with a sweet sugar glaze, hmmm so good!!
What’s the easiest way to make yeast dough for Soft Doughnuts?
Enjoy the step by step pictures and recipe
Super Soft Doughnuts with Powdered Sugar Glaze
Ingredients for the Soft Dough
- 1 cup milk, room temperature:
- 1 egg
- 2 tsp dry instant yeast
- 1 tsp salt
- 1/2 cup sugar
- 3 – 3 1/2 cups all-purpose flour (Canadian is best)
- Add 10 minutes before kneading cycle is complete
- 1/4 cup butter (1/2 stick)
Ingredients for Powdered Sugar Glaze (whisk together)
- 2 cups powdered/confectioner’s sugar
- 1/4 cup water or whole milk
Also:
- Oil for frying
- 3 inch round cookie cutter
- 1 inch round cookie cutter
- Flour for dusting
How to make Soft Doughnuts with Sugar Glaze
Make the dough for Homemade Doughnuts
- Place all ingredients except for butter in the bread maker, in the order listed. Turn breadmaker to dough cycle. My breadmaker kneads for 30 minutes. {If you do not have a bread maker, do the same thing in the mixer and start with the slowest speed, then increase speed 1-2 numbers and kneed with the dough hook for 20 minutes}
- Add room temperature butter 10 minutes before the dough cycle is complete. Try not to open the lid after this so that warm air does not escape. {No bread maker: cover bowl with dough and set in warm, draft-free place. Or set the bowl with the dough over another bowl filled with warm water, making sure that the warm water touches the bottom of the bowl with the dough. For best results, the water temperature must be around 90F}

- Allow the dough to rise and double in volume. My bread machine takes 1 hour.
Forming the Doughnuts
- Once the cycle is complete and the dough has risen, sprinkle the working surface with flour and dump the dough onto it.
- Shape the dough into a ball by pulling ends towards the middle.
- Flip the dough smooth side up and let rest for about 10 minutes. This relaxes the dough and makes it easier to roll out as it doesn’t spring back as much.
- Roll the dough with a rolling pin, on a floured surface to 1/2 – 3/4 inches thick (depends on how you like it), checking to make sure that the dough underneath is not sticking.

- Using a 3-inch cookie cutter (or an upside down 3 inches round sturdy glass/cup), cut out as many circles as you can and set them over the floured surface. Then use a 1-inch cookie cutter and cut out the middle. Making a hole in the middle helps the doughnuts cook thoroughly. Leave the scraps, they will be fried as is.
Frying the homemade doughnuts:
- Heat about 1 1/2 – 2 inches of oil in a 4 qt pan or larger if you don’t mind using more oil, to 350F over medium-high heat. Cast iron or heavy bottomed pans work best when frying. If you don’t have one, any type will work but will take more effort to keep the temperature even from batch to batch.
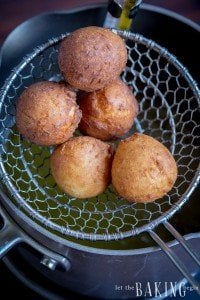
- Place several doughnuts into the hot oil and reduce the heat to medium. Fry on each side for about 2-3 minutes or until golden in color.

- Do not overcrowd the pan as I did here. The doughnuts expand drastically so make sure to leave some space.
- Remove doughnuts to a rack set over a paper towel to catch any oil dripping. Fry all doughnuts, and then scraps in an above-described manner.
Make the Glaze for these glazed donuts:
- Combine 2 cups powdered sugar and 1/4 cup water or milk.
- Whisk until smooth. If you want the glaze to be thicker add more powdered sugar, if you want it thinner, add more water 1/2 teaspoon at a time.
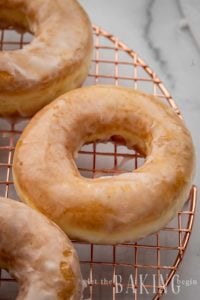
- Dip each doughnut and set over a rack.

All done!

What is your favorite doughnut type?
There are so many different types of doughnuts. You can get them in many shapes, sizes, and flavors. What is your favorite type of donut?
Have you tried these delicious doughnut recipes?
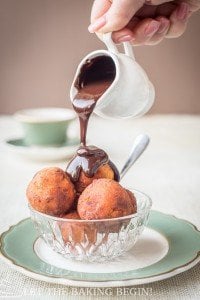
- 15 Minute Ricotta Donuts – Soft, fluffy donut bites sprinkled with powdered sugar and chocolate.
- Simple Sugar Coated Doughnuts – Another great reason to love doughnuts!
- Quick Ricotta Doughnuts – Quick, simple yet delicious doughnut recipe!
Super Soft Doughnuts with Powdered Sugar Glaze

Super Soft Doughnuts with Powdered Sugar Glaze is the only doughnut recipe you'll ever need! These homemade doughnuts are soft, yet crispy topped with sugar glaze.
Ingredients
Make Dough
10 minutes before kneading cycle is complete add the following:
- 1/4 cup butter 1/2 stick, room temperature
Powdered Sugar Glaze
- 2 cups powdered/confectioner's sugar
- 1/4 cup water or whole milk
Also
- Oil for frying
- 3 inch round cookie cutter
- 1 inch round cookie cutter
- Flour for dusting
Instructions
Make the Soft Doghunut Dough
-
Place all ingredients except for butter in the bread maker, in the order listed. Turn breadmaker to dough cycle. {If you do not have a bread maker, do the same thing in the mixer and start with the slowest speed, then increase speed 1-2 numbers and kneed with the dough hook for 20 minutes}
-
Add room temperature butter 10 minutes before the dough cycle is complete. Try not to open the lid after this so that warm air does not escape. {No bread maker: cover bowl with dough and set in warm, draft-free place. Or set the bowl with the dough over another bowl filled with warm water, making sure that the warm water touches the bottom of the bowl with the dough. For best results, the water temperature must be around 90F}
-
Allow the dough to rise and double in volume. My bread machine takes 1 hour.
Shape the Doughnuts
-
Once the cycle is complete and the dough has risen, sprinkle the working surface with flour and dump the dough onto it.
-
Shape the dough into a ball by pulling ends towards the middle.
-
Flip the dough smooth side up and let rest for about 10 minutes.
-
Roll the dough with a rolling pin, on a floured surface to 3/4 inches thick (depends on how you like it), checking to make sure that the dough underneath is not sticking.
-
Using a 3-inch cookie cutter (or an upside down 3-inch round sturdy glass/cup), cut out as many circles as you can and set them over the floured surface. Then use a 1-inch cookie cutter and cut out the middle. Leave the scraps, they will be fried as is.
Fry the doughnuts
-
Heat about 1 1/2 – 2 inches of oil in a 4 qt pan or larger if you don’t mind using more oil, to 350°F over medium-high heat. Cast iron or heavy bottomed pans work best when frying. If you don’t have one, any type will work but will take more effort to keep the temperature even from batch to batch.
-
Place several doughnuts into the hot oil and reduce the heat to medium. Fry on each side for about 2-3 minutes or until golden in color. Do not overcrowd the pan.
-
Remove doughnuts to a rack set over a paper towel to catch any oil dripping. Fry all doughnuts, and then scraps in an above-described manner.
Make the Powdered Sugar Glaze:
-
Combine 2 cups powdered sugar and 1/4 cup water or milk.
-
Whisk until smooth. If you want the glaze to be thicker add more powdered sugar, if you want it thinner, add more water 1/2 teaspoon at a time.
-
Dip each doughnut and set over a rack.
-
All done! Enjoy!

Thank you for following me on Instagram, Facebook & Pinterest!
Hashtag your photos #LetTheBakingBeginBlog so I can see your creations and for a chance to be featured!
Marina | Let the Baking Begin


I never succeed made dough with hydration over 70%, it always turned out so sticky. Even when I proofed in the refrigerator. What do you think is the problem? Not mixing enough?.
When the dough is meant to be with high hydration, stickiness sometimes is expected. You just have to kind of handle in quick strokes, so that the dough has no chance to stick, or use greased hands and surface when you work with it. Hope this helps.
Awesome recipe. I Love it greatly. Thank you so much for sharing.
Thank you for sharing your feedback Jillian!
Send me your all recipes.
What brand of the Canadian flour do you use?
Wow, no need to be so rude!
I can’t wait to try these! One question, though; you say to add the butter 10 minutes before the end of the dough cycle. I am assuming you mean 10 minutes before the end of the kneading cycle and before the dough is left to rise?
And what type of oil do you use for frying? Thanks!
It is best to use oil that has a high smoking point, like Canola oil, but I use olive oil since that is what I have in the house.
Yes Cheri, you got this right! 🙂
Hi Marina,
Thank you for the amazing and simple recipe.
Just one question, can U use the same recipe to make choco;ate filled doughnut? what will I have to take into account while doing so?
Thanks,
Albarbos
Hi Albarbos,
If it’s just the filling you’re adding, then there’s nothing to change about the doughnut recipe itself. I bet it will be delicious though!
Hi rally more,
This recipe is for the doughnuts that you see on the pictures. If you think the end result is wrong, then you definitely do not have to follow my recipe. Otherwise, there’s nothing wrong with the recipe.
Salt or sugar will kill the yeast only if there’s a very high concentration of said salt or sugar. Since the yeast is dry and will need to be dissolved in a liquid before becoming active, the small amount of salt (which is dry also and will need to be dissolved) is not enough to kill the yeast, as apparent by the end result.
But if you’re convinced that salt and yeast going together will hinder the end result, you’re more then welcome to add the salt last, it definitely won’t hurt.
Thanks for stopping by!
Marina
I don’t have both the bread maker and stand mixer. So how will I add the butter at the end if I am hand kneading it.
With you hands, first trying to knead the dough in the bowl (with the butter) and then on the table 🙂
I’m looking for a recipe for donuts that are super soft. Like no crispy parts, just all the texture of super soft fluffy bread. Are these more on the crispy side? I’m having trouble figuring it out from pictures…
Hi Emily,
Anything that’s fried will be crispy at first, but after about 30 minutes the moisture from the inside makes the outside soft. Out of all the recipes that I have tried, I found this one to be the softest. Hope this helps!
Hi, I just discovered your site and this looks really good. Can I mix and knead the dough using my stand mixer? I don’t have a bread machine. Thanks!
yes, you can definitely do it with the mixer 🙂
Could I make this dough the night before and fry thdm up in the morning?
I have not done that so I can not tell you exactly if its going to work. Sorry 🙁
Thank you so much for step by step instructions…love it! 🙂
You’re welcome Oxana 🙂 Enjoy 🙂
Hi Marina, how much sugar it only says 1/2 .Thank you!
Hi Ruslana,
It’s 1/2 cup sugar 🙂 I corrected it in the recipe 🙂
Are you kidding me!! Those look amazing! The last picture killed me. Also, you sister lives a floor above you? I am so jealous! I really miss mine.
Yes, she lives right above me, so I get to enjoy her two boys running above my floor ))) Other than this it’s awesome to have her right by. We visit each other pretty often and share foods that we make all the time 🙂