Rustic Farmer’s Bread
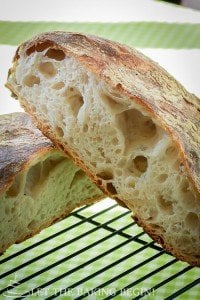
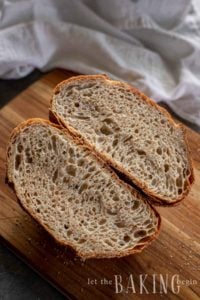
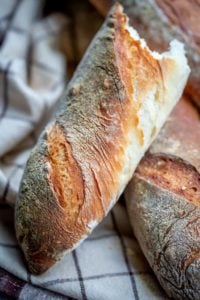
This Farmer’s Rustic Bread Recipe is the best Homemade Bread. Easy Bread Recipe with a golden crackly crust and a chewy crumb, made with just a few basic ingredients. You will love the aroma your house fills with when it bakes!
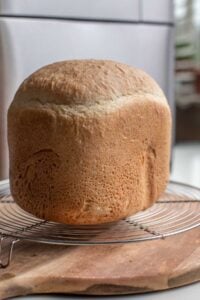
If you enjoyed this Bread Recipe, try our Bread Recipe for Bread Maker.

This recipe Easy Bread Recipe is an adaptation of this recipe from Brown Eyed Baker. Her simple instructions were very tempting so I gave it a go. Large holes, chewy crumb, and a golden crust made it impossible to resist wanting to make it.
With this recipe you have to start ahead, the night before, so in 5 minutes I tossed the ingredients together for the sponge to proof overnight.
Rustic Bread Recipe
In the morning, I got my dough out, added the rest of called ingredients, kneaded it, then let the dough proof. Then divided the dough and folded it and let it proof again. The process has quiet a few steps but once this baby baked, oh my! The crackle, the chew, the aroma – it’s intoxicating! I love baking bread, it’s such a therapeutic experience.
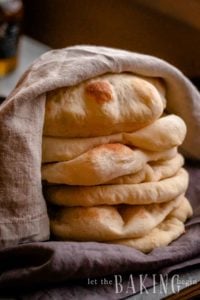
With just a few simple ingredients this Easy Bread Recipe turned out delicious!
If you enjoy chewy Homemade Bread with crispy crust then this one is for you!
Rustic Farmer’s Bread
Adapted from: Brown Eyed Baker
Make the Sponge:
- all-purpose flour
- instant (rapid-rise) yeast
- water, room temperature
Make the Dough:
- Canadian all-purpose flour or bread flour is best (both high in protein/gluten)
- salt
- instant (rapid-rise) yeast
- water, room temperature
- whole or 2% milk, room temperature
Beware! The pictures below show a tripled batch.
Prepare the sponge 1 day or the night before baking this Easy Bread Recipe:
- Make the biga first: Toss flour, yeast, and water in a bowl of a mixer and stir together until it comes together. Cover the bowl and let sit at room temperature in a draft-free place (room temperature) for 8 to 24 hours.
Next day, Make the Dough:
- Add flour, salt, yeast, water & milk to the risen sponge and fit the mixer with the paddle attachment. Combine everything at low speed, then continue mixing for a minute or two.
- When the dough comes together nicely, change to the hook attachment and knead the dough for about 20-30 minutes. As soon as the dough looks smooth and tacky to touch turn off the mixer. Do not over mix, or after looking smooth and elastic it will return to looking runny and broken.
Important:
The bottom right picture is the dough during the mixing process, you can see that as it swirls around the bowl it does not stick and holds the round shape. Once the mixer stops, the dough flows back down and becomes flat because this is a high hydration dough. This is ok. The dough is meant to be very wet, which is what creates the chewy and moist crumb.
If your dough doesn’t look like that after kneading, it means that you have too low of a percentage of gluten flour. Gluten is what helps the dough take shape and trap the air bubbles as it expands. You can add a little more flour to help the dough come together.

- Cover the bowl with a towel or plastic wrap and let rise for 1 to 2 hours or until doubled in size. Notice that the dough is not firm at all.

- Spray working space with non-stick spray, or spread with oil.
- “Pour” the dough out onto the working space.
- With a greased spatula or hands fold the dough over itself on all sides. Do this one more time, folding all four sides. This is very important: This is what gives the bread its shape. As you fold, the gluten is stretched and helps the bread hold shape during the final folding.
- Leave the dough on the counter to rest for 30 minutes, covered with a towel.

- If working with only one batch, split the dough in two. (If tripling the recipe, split in six)
- Shape: Spread it out into a 10×6 rectangle, then roll it tightly into a log. Press down with your fingers every one inch to flatten it if you want it to have the flat ciabatta look. If you want a regular loaf, do not press down with your fingers, just keep it log-round.
- Proof: set on a piece of parchment or aluminum foil and let the dough rise for 30 minutes, covered. Sprinkle the dough with flour.

- Preheat oven: One hour before baking, turn the oven to 450F and set the rack to the lower half of the oven. If you have a pizza stone, baking steel or something similar set it on the rack and allow to preheat for at least 30 minutes.
- Sprinkle the loaf with a spray bottle and put it in the oven on the stone.
- Bake for 15 minutes or until the top is golden, then put the bread bottom side up and bake for an additional 10-15 minutes or until the inside registers 200F.
- Allow the bread to cool completely before cutting, about 1 hour.

How long will this White Bread Recipe last?
This Rustic Bread Recipe can be stored at room temperature, wrapped in plastic or in a Ziploc bag. It can last up to 3 days, or frozen for up to 1 month if double wrapped in plastic and then 1 layer of foil.
To re-crisp, put the Homemade Bead in a 450F oven for 5-7 minutes.
Try these other BREAD recipes:
- Rustic Baguette Recipe – Long, crispy baguette recipe.
- Artisan No-Knead Bread – Simple bread recipe with no-knead!
- Golden Buttery Sesame Burger Buns – Delicious homemade burger buns.
Rustic Farmer's Bread
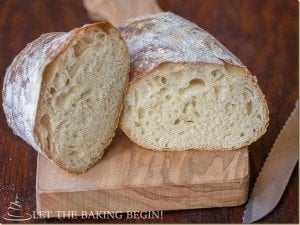
This Farmer’s Rustic Bread Recipe is the best Homemade Bread. Easy Bread Recipe with a golden crackly crust and a chewy crumb, made with just a few basic ingredients.
Ingredients
Make the Sponge:
- 1 cup bread flour or all-purpose Canadian flour
- ⅛ teaspoon yeast, instant rapid-rise
- 1 cup water room temperature ( around 70°F)
Make the Dough:
- 2 cups bread flour or all-purpose Canadian flour (or any other high protein (13% +))
- 1½ teaspoons kosher salt
- ½ teaspoons yeast, instant rapid-rise
- ⅔ cup water room temperature ( around 70°F)
- ⅓ cup whole or 2% milk room temperature ( around 70°F)
Instructions
A day or night before baking the bread make the sponge:
-
Make the biga: Toss 1 cup high protein flour (Canadian or bread flour is best), ⅛ tsp yeast, and 1 cup water in a bowl of a mixer and stir together until it comes together. Cover the bowl and let sit at room temperature in a draft-free place (room temperature) 8 to 24 hours.
Next day, Make the Dough:
-
To the risen biga add 2 cups flour, 1½ tsp salt, ½ tsp yeast, water (start with ⅔ cup water and & 1/3 cup milk and fit the mixer with the paddle attachment. Combine everything on low speed, then continue mixing for a minute or two. When the dough has come together nicely, change to the hook attachment and knead the dough for about 20-30 minutes or until it stops sticking to the sides of the bowl and becomes tacky to touch. The dough should be somewhat runny, but if you stretch a piece into a "window" the dough stretches thin and doesn't tear.
As soon as the dough wraps around the hook into a dough ball and feels tacky to the touch stop mixing. This might take more or less time depending on the protein content of your flour. If your dough doesn't come together and continues to look like batter after kneading, it means that your flour doesn't have enough protein to hold the structure. You can add more flour to bring it more together, but it's likely that the results will not be the best.
Do not continue kneading after the dough stops sticking to the sides. Over-kneading will cause gluten strands to break and will make your dough runny. If you try to lift the dough, it will run through your fingers.
-
First Proofing: Cover the bowl with a clean kitchen towel or with plastic wrap and let rise for 1 to 2 hours (depends on how warm the room is) until doubled in size.
-
Second proofing & stretching: Spray your working surface with nonstick spray or spread 1-2 tablespoons oil. ‘Pour’ the dough out onto a working surface, then with a greased spatula fold the right side of the dough onto itself, then the left side, the side closer to your onto itself, then the side away from you onto itself. Repeat the folding 4 sides one more time. Leave the dough on the counter to rise for 30 minutes, covered with paper or cloth towel.
-
Shape & proof: Carefully split the dough in two trying not to deflate the air pockets as much as you can (I tripled the recipe in the pictures above, so I had 6). Spread it out into a 10x6 rectangle, then roll it tightly into a log. Press down with your fingers every one inch to flatten it if you want it to have the flat ciabatta look.
If you want a regular loaf, do not press down with your fingers, just keep it round. The foil will make it easier to transfer the bread to the oven.
-
Third proofing: Let the shaped dough rise for 30 minutes to 1 hour, covered or until doubled in size. Sprinkle the dough with flour (optional).
-
Preheat oven: About 1 hour before baking, preheat oven to 450°F and set the rack to the lower half of the oven. If you have a pizza stone or something similar set it on the rack and allow to preheat in the oven.
-
Spray the loaf with a spray bottle and put it in the oven on the stone.
-
Bake for 15 minutes or until the top is slightly golden, then unpeel the foil and put the bread bottom side up and bake for another 10-15 minutes (or until the bottom is golden). Allow the bread to cool completely before cutting, about 1 hour.
Recipe Notes
This bread can be stored at room temperature, wrapped in plastic or put in a zip-lock bag, for up to 3 days, or refrigerated for up to 1 month if double wrapped in plastic and then 1 layer of foil.
To re-crisp the bread, put it in a 450 oven for 5-7 minutes.

Thank you for following me on Instagram, Facebook & Pinterest!
Hashtag your photos #LetTheBakingBeginBlog so I can see your creations and for a chance to be featured!
Marina | Let the Baking Begin


I used bread flour, kneaded for 30 minutes, still a sloppy mess. Added 1/2 cup flour, kneaded 10 more minutes, still no ball. Added another 1/2-3/4 cup flour. Kneaded 10 more minutes. Still no ball or cleaning sides of bowl. Gave up. Letting it proof. We’ll see what happens.
Is it possible to make this without the mixer and all it’s attachments you mention switching to?
I’m looking for a 1918 canadian cookbook w/bread recipe that uses 1 package yeast 24 cups water & overnight.
Hi Marina, I made the recipe yesterday, exactly as you described it, it was excellent. Bread recipes are always a little complicated, as the classification of flours we have in Brazil are different. I had made ciabatta a few times before, but I had never used milk in the recipe. The crust was crunchy and chewy crumb. I love your recipes!
Hi Jaqueline,
Thank you so much for your feedback! Different ingredients, humidity, tools, and environment sometimes produce different results but I’m glad that it all worked out the way it was supposed to.
I read this post thoroughly (3x) before attempting this bread. I was expecting it to be a total failure because I did not have high gluten flour. I used 11.7% protein KAF AP. After adding the 2 cups of flour to my biga, I got a wet mess. I was in despair. I even told my family to eat cereal for breakfast because the bread was ruined. I added about 3/4 more flour, kneaded it for 20 mins in my Zojirushi, and followed the remaining directions. The crust looked beautiful. The crumb does not resemble that of the bread in the pic, but it was chewy and so tasty. My family LOVED it, esp. my 5 and 10 yr old who ate several slices w/ either butter or strawberry preserves. I am determined to do this recipe justice. I ordered Canadian flour online. It should be here in 10 days. I will make the bread again and let you know how it goes. Thanks for sharing this delicious recipe.
This bread is freakin awesome. We pounded the first loaf yesterday and I had tons of extra poolish so I’m making another loaf today. FYI, I’m quarantined with only all-purpose flour. I just added a bit at a time until the dough just came together. I’ve made a million loafs of bread but was always afraid to make one with a wet, gooey dough. This is going to give me a lot more confidence moving forward. Thanks for the awesome recipe.
Trying to make this bread today, but not everything as it says in the recipe. The proportion of liquid to flour is not right. There’s only three cups of flour to two cups of liquid, it didn’t form the dough, it was just a thin batter. I had to add and add some more flour for the batter at least resemble bread dough. I read some comments and I am not the only one who had this problem. And the rest of instructions not very clear. I love bread and not a novice in bread making and love to try new breads. This one is not the best try.
Hi Valentina,
this bread is made with very high water to flour ratio, which is what makes the bread crumb so moist and delicious. This also means that the dough will only hold shape if you knead it until it develops gluten. It starts out runny and then as you knead it, the gluten activates and creates a gluey structure that makes the dough hold shape better. For any type of high water to flour ratio bread it is best to use Canadian or bread flour, which will help with keeping shape. You can see on my pictures as well that the dough was very runny.
Did I miss something…..you say to unpeel the foil but where does the foil come in?
The bread is allowed to proof after shaping and before going in the oven, on the foil. So, after the initial 15 minutes of baking, it is unpeeled to allow the bottom to crisp up.
Trying to decide to bake the bread, but can I bake it using “convection ” bake ????
Yes you can, I think the convection setting heats even higher than regular, which works even better for bread.
Hello Marina! My name is Vita! Made the sponge today want to try this recipe of yours, we all love bread! Do u oil the foil? It will not stick to the foil if I don’t oil? And u sprinkle with water?
Thank u
Hi Vita!
You’re right, if you oil the foil or even use parchment paper, the bread will not stick. Although, even without oiling it, it didn’t stick too mich.
The water is sprinkled on the bread to create steam inside the oven, which helps the bread form a good crust.
Thank you so much for your comment!
Enjoy your week!
Marina
Stumbled across this recipe last night. Threw the sponge together and hoped for the best. I’ve been trying for so long to get a chewy, crusty bread. The whole family is gathered in the kitchen now. Had no probems at all the recipe. Thanks So Much
Thank you Helen,
I’m happy that you had success! Bread is not for the faint at heart and you did it!!
In the baking instructions you say peel the foil off. I don’t see any place where you wrap it in foil. I’m confused.
Once you divide and shape the dough, you place it on foil and let it rise. Then you transfer the dough with the foil attached to it onto a baking stone or baking sheet. So, once the top is browned, you unpeel the foil and put the bread loaf upside down to brown the bottom side. Does that make sense?
Super yummy and delicious. Great instructions Marina. We loved that you called the starter dough “sponge”, it’s true that it’s a sponge, but we never came across such an expression before in baking recipes:)
We recently baked a Greek lagana (which is a similar flatbread served here in Greece during Lent) but your ciabatta and your loafs look truly fantastic.
Exceptional work, pinned!
Mirella and Panos
Hi,
Yes the starter dough is called a sponge 🙂 Thanks so much for your comment Mirella & Panos!
Bread is excellent and easy to make.
Hey! This recipe looks great! Little complicated, but great. I’ve made bread before with all different recipes. I want to make this recipe but saw you have a kitchen aid to mix it. I have one as well but we currently moved and I don’t have acces to it right now. Can I mix by hand, or with an electric mixer? What are your thoughts. Thx!
Hi Sierra,
To be honest, I’m not sure how it would work if you mixed it by hand since the dough is very runny, and it would probably be very difficult to mix.
Ok thank you. 🙂
I can’t tell you how much this bread makes my mouth water just looking at it! I gotta try this recipe ASAP! Thanks for sharing!
There’s nothing like making your own bread, hope you enjoy it once you do!
Thanks for commenting!
I made this bread yesterday and I have to say it tastes amazing but I don’t know if I’ll want to go through the effort of making it again…. I was sooo sticky and runny it was like pudding so i added more flour. Its still never “come together” so I went ahead and started to kneading… it was still quite gooey. It did rise well in the bowl but after everything was all said and done my bread came out pretty flat. I’d say it was no more than 2″ tall and stayed very wide like 7″. It does taste great so I think we will just cut it into strips and serve it with meats and cheeses. Any advice? I used the whole 1 cup of water but i ended up adding at least 1/2 cup more flour… I do live in Colorado so maybe it was because of the altitude? donno TIA – 🙂
We made this bread and we did have some issues with the amount of flour. It involves quite a few steps but……….it is delicious!!!!!!!! We thought it was too complicated but now that we tasted it, I guess we will be doing it again after all. Thanks for sharing.
Hi, your photos look amazing and the recipe too…but I have one small complain about the measurements, how on earth do I measure 1/8th of a teaspoon? and also the 2/3rd of cup ? Wouldn’t be better to give the exact gm amounts? i.e.: 15gm or 175ml water that would be precise. Just a tip…thank you for the lovely recipe. Patrizia
Hi Patricia,
Thank you for your comment!
Here in US we have measuring spoons with spoons that say “1/8” of a spoon, or 1/3 of a cup. I’m guessing you’re not from here and that is why it doesn’t make sense.
I wonder what speed some of these ladies had their mixers at. I had my KitchenAid set at a 4 and the dough looked exactly like you pictured it!
well thanks Katherine 🙂
Question. Can I freeze the dough and cook later? Would I have to let it rise again? I took your advice and tripled the batch, but I don’t want to be stuck around the oven all day.
I would not recommend freezing as it will not rise as high. It’s better to bake all the bread and freeze the baked bread instead.
I tried making this 2 x and never could get it to rise…. I guess it just isn’t a good one for me to start with 🙁 I have a kitchen aid I left it on with the dough hook for an hour and it never did pull away from the bowl… Once it started to rise, then fell and started to bubble…. A Pinterest fail.
When you say that it never pulled away from the bowl what do you mean? it isn’t supposed to completely come off the bowl in one ball, but the sides of the bowl should start to look clean where it used to stick, is this how it was? If that is how it was, then that is all you need.
How long did you leave it to rise before it started to fall? Was your dough the consistency it shows on the picture when you were done mixing it?
I feel like there’s something up with the ingredients you used. It might be the brand of flour or kind of flour you used that just wasn’t good, or it might be that too much yeast was used in the recipe… I need a little more details before I can start to guess what went wrong…
Working with wet dough is very challenging at first because we’ve always been told to knead and handle our dough. Wet dough is extremely fragile and takes a very light touch. If you try to handle it roughly as you would with a more traditional less wet dough, you WILL fail. Touch it as little as possible, only enough to shape it, add as little flour as necessary, put the temp up to where Marina has restated it, and you will be successful! Nothing store bought will even come close to what you’ve prepared.
Hi Penny,
with this recipe initially when you use the mixer or the bread maker to knead the dough, you need to really knead it and handle it until it becomes stretchy and doesn’t stick to the sides of the bowl. Once it is knead, and you’re shaping the bread before it goes in the oven, you’re right, you need to be very gentle with it, as not to disturb the air bubbles that are already in there.
I haven’t tried the recipe here yet, but you might be interested by this style of bread-making. http://theitaliandishblog.com/imported-20090913150324/2010/2/26/amazing-artisan-bread-for-40-cents-a-loaf-no-kneading-no-fus.html
I only bake this fresh bread for my family now (vs buying in store) and they love it. It’s so easy. I did run into the same water to flour ratio problem you did. I only use 5 cups flour to 3 cups water and spend 2 mins mixing it by hand.
I found the best technique is to mix the yeast, salt and water then gently distribute all the flour on top of the water. Then I use my hand to swirl the flour into the water from the middle out…kinda like making pasta…if that makes any sense.
I like that I can make smaller loaves (or big ones if i want) and I only have to do the prep once a week or so. My kiddos like a softer crust so I skip the water step, but it still turns out fabulous.
I actually have that same recipe posted here on my website, with the original video and all 🙂 https://letthebakingbegin.com/2009/04/no-kneed-bread/ Yes that bread is great, and if you don’t want to fuss with the dough, it’s the best there is! but, this bread is a step above that one. It produces a more chewy crumb, and the bread is more springy… so to say. You should try making this one at least once to see what I am talking about 🙂 I usually mix 3-4 batches at once, that way I have a steady supply of great bread without having to turn my oven 🙂
what about the aluminum foil?? it is in the pictures but not in instructions.
Yes, I was also wondering about that. I baked the bread at 350F for half an hour and it came our white i.e. had no colour to it and so I was wondering if the tinfoil was needed to give it colour? Perhaps the baking temp is too low? The original post referred to in Marina’s post says to bake at 450F? So I’m also looking forward to clarification….
The tinfoil really doesn’t do anything except help with cleanup, but the temperature was too low 🙁 I baked it at 350 after posting the recipe and had the same thing, so yes, you should increase it to 450 for proper crust and color formation. I already changed it in the recipe.
I just baked mine and it’s very flat, unappealing, and has zero color on it. Grr! I’m super frustrated with making bread! Except Amish Friendship Bread, I’ve got that down pat.
Hi Marina. My hubby and I made this bread this weekend and I just have a few comments / questions. Firstly, we found that the dough was very sticky and “runny”. I tried to knead the dough using my KitchenAid mixer but after half an hour, the dough hadn’t firmed up at all. It was so sticky that it seemed to be unworkable and hence I needed to add quite a bit more flour. Could you let me know what texture the dough is supposed to have after the kneading stage? Next, we did the steps called for and then baked a loaf of bread on a baking sheet. On removing the bread from the oven after 30 mins we found that it was cooked but had no colour to it at all i.e. the crust was white and had no brown colour. Were we supposed to bake it in tinfoil? I note tinfoil in your pictures but the steps don’t say to use tinfoil and whether the tinfoil should be folded over the bread or what to do with it? Lastly, our bread was very “stodgy” and “heavy”. It tasted fairly good but it didn’t look like yours. It was more like a heavy Portuguese bread. I would love to master the art of bread making and so would appreciate your feedback. Many thanks. Kim
Hi Kim!
The dough is supposed to be very sticky and runny. If you look on my pictures you will see that when I pour it out of my bowl onto the working surface it almost goes flat, cuz it’s so runny. The high water to flour ratio is what gives the bread the chewy crumb (like ciabatta would have). I do want you to know though, different flour (brands) will take up different amounts of liquid and will make for different types of textures of the bread. When following the recipe myself (from the source mentioned in the text), I found that when I added the amount of water the author called for, my dough was much firmer then what hers looked like on the pictures, so I added more water. It might be the case that with your flour, or your air humidity, so in your situation you need to add either less water or more flour. Check out the original recipe and see how much water she adds, and what her dough looks like. That might help.
At the end of the kneading cycle, the dough is extremely sticky, you definitely can’t take it out of the bowl with your hands, without getting them all stuck to the dough. That is what its supposed to be. When the mixer kneads it, it will start out sticking to the bowl a lot, but as the gluten develops, the dough will stop leaving the bowl stuck up with dough. So even though the dough is sticky, the edges of the bowl will be ‘clean’ like you can see on the picture.
Another thing – if your yeast has been sitting in the cupboard for too long, it might not be very active anymore, thus not rising your dough enough, and giving you the ‘stodgy” & “heavy” feel to it.
I just bought a 50 bag of Canadian unbleached all purpose flour and found it to be horrible. It makes ‘heavy’ everything. I just made doughnuts yesterday and was horrified to find that my recipe for doughnuts that I use all the time, produced gummy, heavy, and just horrible doughnuts. So if I didn’t know better I would say that the recipe is bad. But since I have been using that recipe with Canadian Bleached all purpose flour with great success for a long time, I know that it’s just this flour that I am using…
There’s a few variables that can be affecting the outcome of the bread, so I hope you guys find what it is and are able to make this recipe into a successful loaf of bread.
Kim, I’d swear you were in my kitchen right now! I have had the same exact problems! My dough looked like cake batter it was so thin. Sadly, I was forced to add more flour so I know it’s going to be pretty dense. I’ve got about 3 minutes left and there is ZERO color on my bread. I think I’ll oil wash it and try again.
Hi Jenn,
I hope you had a minute to read my response to Kim, as I described what the dough looks like at the end of the kneading cycle and as I mentioned, it is supposed to be very sticky – that is what produces that chewyness in the bread. But towards the end of the kneading cycle, you will see that the sides of the bowl will be clean (meaning that the dough no longer sticks like it did in the beggining) as the dough is spun around. This does not at all mean that you will be able to remove the dough from the bowl and it will not stick to your hands (it WILL stick to your hands a lot).
As far as the color, anytime you bake, it will usually say “bake for X amount of time, or until golden in color”, so if the bread was not golden or brownish towards the end, it just means that you need to leave it in the oven longer. It can also mean that the temperature in your oven is not what you set it to. For example, some ovens you set them to 350F, but if you actually check the temp with thermometer it will be only 320F.
With bread making, even with simple recipes, there’s several cruical factors that can be out of your control, but greatly affect the outcome. Some flour can produce dense breads no matter what you do to it, if the yeast is not fresh (even if you just bought it) that can make the dough not rise properly, if the oven does not heat up to the temperature that you set it the bread might not brown properly, or make the bread rise fast enough. Anyway, the one recipe that I have found to be pretty much fool proof is the No Knead artisan bread. Have you tried it? It’s super simple, requires minimum amount of labor and produces amazing bread – here’s the recipe if you wanted to try something like it https://letthebakingbegin.com/2009/04/no-kneed-bread/
I am going to try this later today. My family (my husband), really enjoy this type do bread. Looks straight forward and easy to follow.
This bread is wonderful! Your family will enjoy it!
Some seriously gorgeous look bread, Marina and very cute painted finger nails! Love it!
Thanks Julia!
I really try to do my best to not have my hands in the pictures as I do not like my hands, but sometimes they just have to be in there))
That made me laugh because I was just telling my friend who is insisting I should have more photos of myself in the blog that I don’t like my HANDS!!! lol
That makes two of us lol )))
I’ve got to make this bread. It looks amazing 🙂
Sounds like a great idea!)) Let me know if you make it 🙂
Your photos are stunning…I don’t make bread all that often, but when I do, I always choose a rustic loaf like this.
Thanks Sue! Rustic is always best, but sometimes I still make just ol’ regular breadmaker bread when no time allows for something better))